Travel Tie Box Instructions(tm)
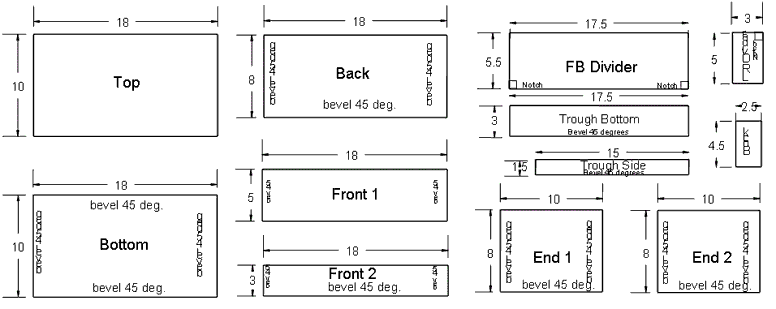
The Travel Tie Box is made from 1/4" plywood. Many of the edges are beveled to 45 degrees. The box can be made without beveling the edges but adjustments must be made to the measurements. The block and reinforcing strips are made from a 1/2" thick board.
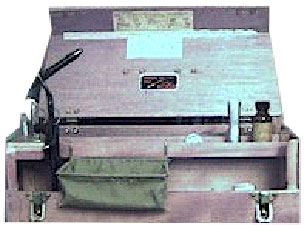
I use a Thompson A vise with the mounting shaft cut off to make it sit lower on the box. I turn the clamp upside down so the mounting screw is on top; this makes it easier to tighten. The scrap catcher is made from a clothes hanger with hooks to hold it on the front of the trough. A cloth bag is sewn to the wire frame and hangs under the vise to catch the clippings (See drawing). You can drill holes in the back of the block to hold your tools for quick access
Material List
 1/4"
plywood
1/4"
plywood
Piece of 1/2" board 18" long or longer
Two hinges 2" long and 1-1/4" wide
Two latches 3" long and 1-1/2" wide
Handle or 8" long piece of leather belt.
Small finishing nails 5/8" long
Nuts and bolts to mount the hardware
Wood glue
One wire clothes hanger
One piece of heavy cloth 14" by 14"
Description
- Cut and bevel all plywood as shown in the drawing (page 4). The beveled side of the wood will be on the inside of the box so if there is a bad side, place the bevels on that side.
- Cut 1/2" by 1/2" square strips of wood from a board until you have three 17 1/2" strips, two 9 1/2" strips, four 7 3/4" strips, two 5 1/4" strips two 3" strips and two 2 3/4" strips.
- The strips are glued and nailed to the box for added strength. The finishing nails go through the plywood and into the strips. In order to accomplish this you must draw nailing lines along the bevels on the non-beveled side of the plywood. The nailing lines should be 1/2" from the edge. Take a ruler and mark nailing lines on the back of every beveled edge except the (Trough Bottom) and (Trough Side).
- Place the (Bottom) with the beveled side up. Take two of the 17 1/2" strips and place them alongside an 18" beveled edge. The ends should be flush with the bevels. Turn the (Bottom) over so the nailing lines show. Drive three nails into the four nailing lines so they just penetrate the plywood. One in the center of each line and one about 2" from each end. This will be a total of 12 nails.
- Place glue along one side of an 17 1/2" strip and position it on the beveled side of the plywood so the side and ends are just flush with the bevels. Drive the nails into the strip. Now repeat the process with the other 17 1/2" strip and the other beveled 18" edge. The strips must be positioned so they are at the edge of the bevels, but do not overlap them. Take the two 9 1/2" strips and check that they just fit between the 17 1/2" strips. Glue and nail them in place.
- Place the (End 1) piece with the beveled side up. Take a 7 3/4" strip and place it along an 8" beveled edge with one end flush with the non-beveled edge. It should not overlap the bevel. Turn the (End 1) piece so the nailing lines show and drive two nails into each nailing line so they just penetrate the wood. They should be about 2" from each end. This will be a total of 6 nails. Do the same with the (End 2) piece.
- Take the (End 1) and place glue along one side of a 7 3/4" strip and position it so one end is flush with the non-beveled edge and the side is flush with the 8" beveled edge. Drive the nails into the strip. Repeat the operation on the other 8" side. Now repeat the operation for the (End 2) piece.
- 8. Hold the (End 1) with the 10" edge in position against the (Bottom) 10" edge and check that everything aligns correctly. Place glue along the 10" bevel and the adjacent 9 1/2" strip. Nail the (End 1) to the (Bottom). Now do the same with the (End 2).
- Place the (Back) piece with the nailing lines showing. Place three nails in each line, one in the middle and one about 2" from each end. This will be a total of 9 nails. Place glue along one of the 18 bevels of the (Bottom) and adjacent strip. Now do the same for the (End 1) and (End 2). Hold the (Back) in place and nail it to the (Bottom) and (End 1) and (End 2). See that everything aligns and the beveled edges fight tight.
- Place the (Front 2) with the nailing lines showing. Place one nail in the center of each 3" end and three nails in the 18" edge. Check everything for proper fit. Glue and nail (Front 2)to the (Bottom) and (End 1) and (End 2). Let the glue dry while you work on the divider.
- Draw a vertical line down the center of the (End 1) and (End 2) pieces on the inside of the box. The (FB Divider) will be placed on this line. Two notches must be cut from the corners of the FB Divider so it will slide down over the 1/2" strips on the (Bottom) of the box. The two 5 1/4" strips must be glued and nailed along each end of the (FB Divider). With one end just above the notch and the other end even with the other 17 1/2" side. Glue and nail the (FB Divider) in place with the 5 1/4" strips facing toward the rear of the box. Allow the glue to dry.
- Take the (Trough Bottom) and glue and nail the two 3" strips across the 3" ends on the non-beveled side. If you are a right handed fly tier the (Block) goes on the left. If you are a left-handed tier the block goes on the right (See drawing). Glue and nail the (Block) to the proper end of the (Trough Bottom) on the beveled side. The length of the (Block) goes at right angles to the length of the (Trough Bottom).
- The (Trough Front) fits along the front of the (Trough Bottom) between the edge of the (Block) and the other end of the (Trough Bottom). Drive one nail through the middle of a 2 3/4" strip and glue and nail it across the 3" end of the of the (Trough Bottom) on the beveled side, do not overlap the bevel. Now take the other 2 3/4" strip and glue and nail it along side the block, do not overlap the bevel. Place glue along the beveled edge where the trough side fits and on the ends of the 2 3/4" strips. Glue and nail the (Trough Side) to the end of the 2 3/4" strips. Run a bead of glue between the trough end and the block.
 Place glue on both ends of the trough and along the back edge of the trough
where it fits against the (FB Divider). Slide it into place on the front side
of the (FB Divider). The top of the (Trough Side) should be even with the
top of the (FB Divider). Place two nails through the end piece into the (Block)
and one nail through the other end piece into the end of the (Trough Bottom)
to hold it in place. Allow the glue to dry. Cut a piece of 1/4" plywood
to 2 1/2" by 4 1/2" and glue it flat, on top of the block.
Place glue on both ends of the trough and along the back edge of the trough
where it fits against the (FB Divider). Slide it into place on the front side
of the (FB Divider). The top of the (Trough Side) should be even with the
top of the (FB Divider). Place two nails through the end piece into the (Block)
and one nail through the other end piece into the end of the (Trough Bottom)
to hold it in place. Allow the glue to dry. Cut a piece of 1/4" plywood
to 2 1/2" by 4 1/2" and glue it flat, on top of the block.- Trim the 17 1/2" strip to 17 3/8" and see that it fits loosely between the vertical strips at the front of the box. Center it along one edge of the (Front 1) piece and glue and nail it in place (there are no beveled edges here). Hold the (Front 1) piece in place and see that it fits in front of the box properly and is even with the top. Glue and nail the (Front 1) piece flush with an 18" edge of the (Top). The Top should cover the box and the front should have no gaps, and be free to open and close when you put the hinges on.
- Check that the (LR Divider) fits between the (FB Divider) and the (Front 2). A 1/2" notch must be cut in one end so it will slide over the strip on the (Bottom). Glue it in place (it is not nailed)
- Put the (Top) in place and attach the hinges, latches and carrying handle with the nuts and bolts.
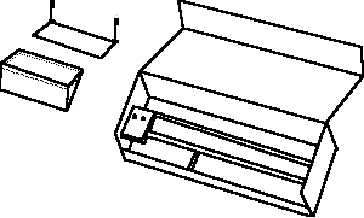
- Straighten out a clothes hanger. Cut a 20" piece. Bend the wire 90 degrees 6" from each end into a big U. Bend the wire 90 degrees 2" from each end so that if the U shape were laying flat the ends would stick straight up. (See drawing). Bend the 2" sections into a U shape that will hook on to the front of the trough. Cut a 9" piece and bend a tight U shape 1/2" from each end for the back. Crimp the U's around the other wire at the bends below the hooks. Sew a bag using the heavy material.